Recipe

How to Make Homemade Corn Dogs Just Like the County Fair

Few things smell more like summer than a fresh corn dog coming out of the fryer at the fair. The good news is that you do not need a food truck or a midway pass to enjoy one. Homemade corn dogs take about 30 minutes, use pantry basics, and taste every bit as good as the ones you buy at the fairgrounds. If you love recreating fair snacks, our guide to DIY fair food recipes has even more ideas to try after this one. In this guide, we walk through the ingredients, the batter, frying, an air fryer option, and the most common mistakes people make the first time. Everything is written in plain steps so a beginner can follow along. What Makes a Fair Corn Dog Taste So Good? A fair corn dog has three things going for it. First, the batter is slightly sweet, which balances the salty hot dog. Second, the coating is thick enough to puff up and stay soft inside while the outside turns crisp. Third, it is fried fresh in hot oil and eaten right away. When you copy those three things at home, you get the same result. The corn dog has a fun history too. Several vendors in the 1940s claim to have made the first one, including stands at big state fairs in Texas and Minnesota. If you like food history, read our piece on why food on a stick sells at fairs across America. Ingredients for Homemade Corn Dogs This recipe makes 8 corn dogs. You can cut it in half for a small family or double it for a backyard party. Ingredient Amount Why It Matters Hot dogs (all beef works best) 8 Firm texture holds up to frying Yellow cornmeal (fine grind) 1 cup Gives the classic corn flavor and crunch All-purpose flour 1 cup Adds structure so the batter puffs Sugar or honey 2 to 4 tablespoons That light fair-style sweetness Baking powder 1 tablespoon Makes the coating light and airy Salt 1/2 teaspoon Balances the sweet batter Buttermilk or milk 1 cup Creates a thick, smooth batter Egg 1 large Binds everything together Neutral oil for frying Enough for 3 inches in a pot Canola, peanut, or vegetable oil Wooden skewers or sticks 8 For dipping and eating Buttermilk gives a slightly tangy, tender coating, but regular milk works fine. If you want a richer taste, swap a few tablespoons of the milk for creamed corn. Some fair vendors do this to get [...]
By |2026-10-13T09:17:36+00:00September 28th, 2026|Corn Dog, Fair Food, Hot Dogs, Recipe|Comments Off on How to Make Homemade Corn Dogs Just Like the County Fair

Irish Soda Bread:A Hearty & Flavorful Bread for Any Occasion

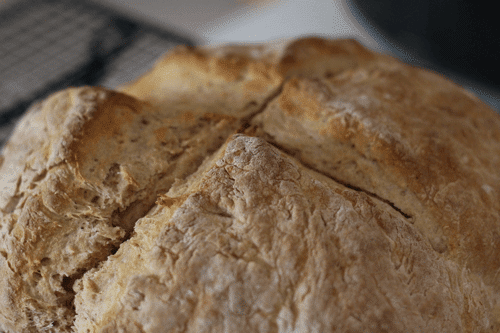
Kent Whitaker who is author of this post Irish Soda Bread, also known as “The Deck Chef,” is an award-winning culinary writer and cookbook author. He’s also penned Young Reader, NASCAR, and History titles. The former winner of the Emeril Live Food Network Barbecue Contest also covers football, motorsports, and bass fishing. Kent currently lives in East Tennessee with his wife, son, and a couple of dogs that love when he fires up the smoker or grill. You can reach out to Kent at www.thedeckchef.com, Facebook, Instagram, and Twitter. If you’ve done any baking from scratch you know that sometimes there’s a fine art to getting yeast to activate and to get the proper rise from your loaf of bread. Or, you can forget about yeast and try your hand at a traditional Irish Soda Bread. This tasty and hearty bread is made from simple ingredients and yeast is not one of them! Baking Soda The main activator for this recipe is baking soda and is very simple to make. I have to thank my niece Tiffany who is a Southern girl and a big-time Auburn Tiger football fan. She now lives with her husband Conor and their family in Ireland. She was my go-to source for a real soda bread recipe which she credits to originally coming from the official Irish Food Board. A Bit of Brown Soda Bread Background Soda bread is a staple in Irish cooking and it’s safe to say that there are plenty of families with their own “secret” recipes. But, food historians trace the original version of the bread back to native Americans who baked a version of soda-style bread with pearl ash as an ingredient. Pearl ash is a natural form of baking soda derived from the ashes of burnt wood. This leavened the bread without yeast. Now, jump forward to the 1800s - specifically around 1830 - when baking soda, or bicarbonate soda, started to be commonly available in Ireland. This kicked off the wave of making Irish Soda bread which is known as being hearty, packed with flavor, and with a signature crusty shell with a pillow-soft interior. ???? Irish Soda Bread As I mentioned above, this recipe was provided to me by our niece Tiffany and her family in Ireland. She credits the government-run Irish Food Board for her starter recipe but mentions it is very versatile and pairs with a wide variety of dishes. But she does have her favorites. [...]

By |2024-01-10T00:40:18+00:00March 6th, 2023|Recipe, Bread|0 Comments

Three Easy Chocolate Covered Strawberry Hacks

Kent Whitaker, Author of this Chocolate Covered Strawberry Post, also known as “The Deck Chef,” is an award-winning culinary writer and cookbook author. He’s also penned Young Reader, NASCAR and History titles. The former winner of the Emeril Live Food Network Barbecue Contest also covers football, motorsports, and bass fishing. Kent currently lives in East Tennessee with his wife, son, and a couple of dogs that love when he fires up the smoker or grill. You can reach out to Kent at: The Deck Chef, on Facebook, or Instagram, and Twitter. Chocolate-covered strawberries and Valentine's day go together! The combination of flavor, texture, and sweetness make for a perfect treat. It’s decadent enough to satisfy a craving and yet we can munch down on them without worrying about calories from the chocolate… because calories don’t count on February 14th! Sadly, the calories still count, but why not enjoy the moment! The great thing is that you can make these on your own as a surprise for a loved one. Or, you can make them as a couple, and the recipe can be kid-friendly once the chocolate is melted. Don’t Stress about Melting Chocolate First, don’t worry about melting chocolate. Simply follow the directions on the packaging! Just make sure you purchase melting chocolate for making candy. The package will be marked and in the baking section of your grocery store. Sometimes it’s called “bark” chocolate. If you are comfortable using a double boiler, then go that route. If not, almost every package has directions for using a microwave. And, if you don’t want to melt chocolate and let it re-harden, a simple squeeze bottle chocolate drizzle never made anyone mad! Prep the Strawberries Here’s the secret to making chocolate covered strawberries and it’s not the chocolate! It is the strawberries! To be exact – it is the moisture in the strawberries! People may think they did something wrong with melting chocolate because it does not stick to the strawberry! That may be because the strawberries are moist or wet. Make sure when you rinse and remove excess stems that you allow them to completely dry. And, avoid slicing the strawberries. You want a dry, whole strawberry. One note – leave some of the green at the top of the strawberry, but remove any excess or browned pieces. The Process – Simple! Ok, you have your clean and dry strawberries and some melted chocolate. You also have your sprinkles ready… what’s next? Here’s the trick! [...]

By |2024-01-10T04:22:40+00:00January 27th, 2021|Valentine Day, Fruit, Recipe|0 Comments

Gilled Pizza

Grilled Pizza: Everything You Need to Know Are you looking for something to cook on the grill over the Memorial Day weekend but want something besides burgers, dogs, or any of the other common dishes? Not that there’s anything wrong with traditional Memorial Day eats… but why not grill some pizza? Yep, you can grill pizza! Think of it this way – why buy an expensive outdoor pizza oven if you already have a covered grill? You can use charcoal or gas along with some wood chips of your choice. I’m not knocking outdoor pizza ovens, I think they are cool and make for great pizza. But, if you’re only going to cook a pizza outdoors a couple of times a year… then save some money and fire up the grill and do something different! No Dough Tossing Skills Needed Don’t worry. You won’t have to learn to toss dough over your head like those cool guys in high-end pizza eateries. But I do think that would be fun to learn, or at least give it a try. Here’s how to get your grilled pizza adventure started. First, you need a covered grill. Then you need some store-bought pizza crusts and your favorite toppings. I suggest using smaller crusts as opposed to the large size simply because they fit on grill racks better and are easy to handle. Plus, each person can custom make their own pizza. If you only can find the large crusts then you may need to cut them in half depending on your grill. If you go with a softer crust such as raw dough, then use a cookie sheet, foil, or a grilling mat to pre-cook it before adding your toppings, sauce, and cheese. Toppings from BBQ to Traditional You can use all of the traditional items like Ham, beef, sausage, pepperoni, Canadian bacon, veggies and more. Plus you need some cheese and some sauce. All of this really boils down to your favorite toppings. I suggest that all of the meat toppings be fully cooked. Then, all you are doing is warming things up and melting cheese! Add sauce to your crust along with the toppings, place it on the grill with low to medium heat, close the lid until everything is golden and the cheese is melted. Remember, the crust is done, chances are you used pre-cooked meat toppings so all you have to do is warm everything up and melt the cheese. Your grill determines on if you [...]

By |2024-01-10T23:57:06+00:00May 24th, 2019|Recipe, Pizza|0 Comments

Crescent Moons Filled with Sweet Potato Bliss: Countyfairusa

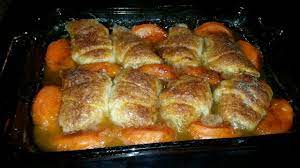
Sweet Potato Crescent Dumplings 1 can refrigerated crescent dinner rolls 1 can (15 oz.) sweet potatoes in syrup, drained (reserve syrup) ½ cup (1 stick) butter or margarine ⅔ cup sugar ⅛ teaspoon ground cinnamon dash ground nutmeg, optional ½ cup of reserved syrup ¼ cup pineapple juice Preheat oven to 350 degrees. Separate crescent roll dough into 8 triangles. Spoon a couple of the sweets potato chunks onto large end of the crescent. Roll up from large end to the smaller tip, enclosing the sweets potatoes inside. Place in a lightly buttered 8 or 9 inch square baking pan. Combine butter, sugar, and spices in small saucepan. Heat until butter is melted. Pour hot mixture over top of filled crescents. Combine reserved ½ cup syrup and pineapple juice and pour over top. Bake for about 45 minutes or until golden brown and crispy on top.

By |2024-03-04T06:08:41+00:00April 15th, 2009|Baking, Recipe|0 Comments
Go to Top